Upload ur own video in youtube

0 comments


for those who dont know how to upload anything----- their own tricks etc on

youtube

very simple n useful....

u need free streaming video s/w like cam studio ,video lan ....

download cam studio :--http://camstudio.org/

now make ur video .......save it with .avi file extension...

create an account in youtube :--http://www.youtube.com/

sign in n upload ur video ......it take few seconds ....

get the url n show ........


demo.....very simple video.....know system info

http://www.youtube.com/watch?v=lW-21LcXZ48

Indian rupee font

0 comments


The Rupee FontDownload it from here : Rupee.ttf

How to use ?
1. Download font Rupee.ttf

2. Install the font. (It is easy. Just copy the font and paste it in "Fonts" folder in control panel)

3. Start using it. :)

How to type the Rupee symbol ?

The developers mapped the grave acent symbol - ` (the key just above "tab" button in your keyboard) with the new Rupee symbol. Just select "Rupee" font from the drop down list of your fonts in your application and press the key just above your tab button. It will display our new rupee symbol. Try it

Make ur own computer Game

0 comments


To make ur own computer game .......

download dis :--http://www.yoyogames.com/gamemaker/

now instead of writing all process ...........i ll give u video.....coz i also learn frm here :p

after downloading s/w .......u just need images in ur pc......browse it......

n that s/w having lot awf keys .....use them to get desire format of ur game like

buttons.....

n control......n moving pics ........

video :--

http://www.youtube.com/watch?v=5f_MhsX7aBc&feature=related

Vector Drawing of Nature Using CorelDraw

0 comments


Well, Previously I posted above picture in our Art Thread, and now I am going to tell you all how I made this step by Step.

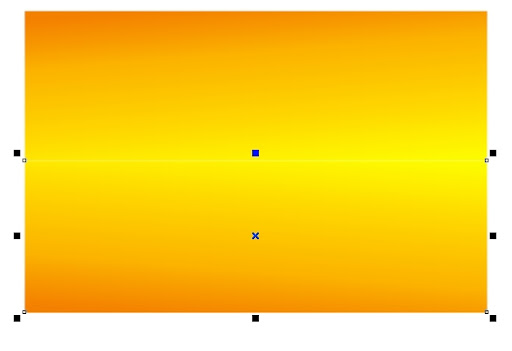
Step 1: Open a blank document in CorelDraw X4. Firstly create one rectangle which you can find in left side TOOL BAR. select it and applied a FOUNTAIN FILL TOOL(See step 8 Pic for FOUNTAIN FILL TOOL), with LINER TYPE from top to bottom. chose two color nearly Orange and Yellow, so sky will look like evening time.


Step 2: Drag the rectangle and made a duplicate reverse Image as shown in below. (Click on free transforms middle point, click and hold your mouse’s left button, drag it and click right button before you release a left button)


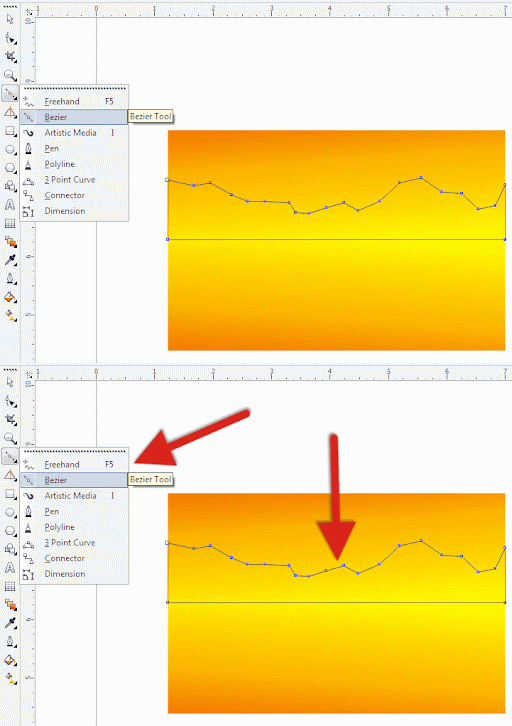
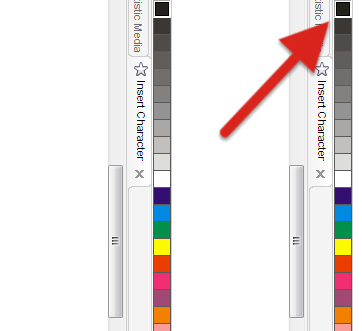
Step 3: Chose a BEZIER TOOL and draw an object roughly as shown below for look like a mountain. Select an object (mountain) and chose a black color from the color bar which is in mostly located on right side.


Step 4: Now our mountain is ready. Select it and repeat step 2 for made a duplicate mirror image like shown in below.


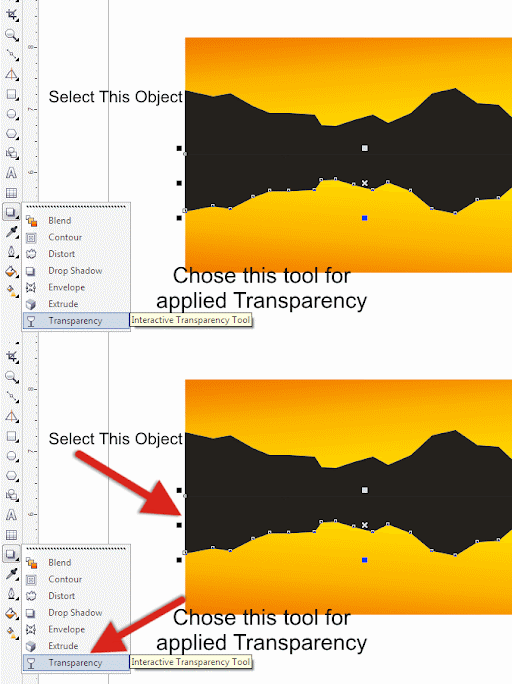
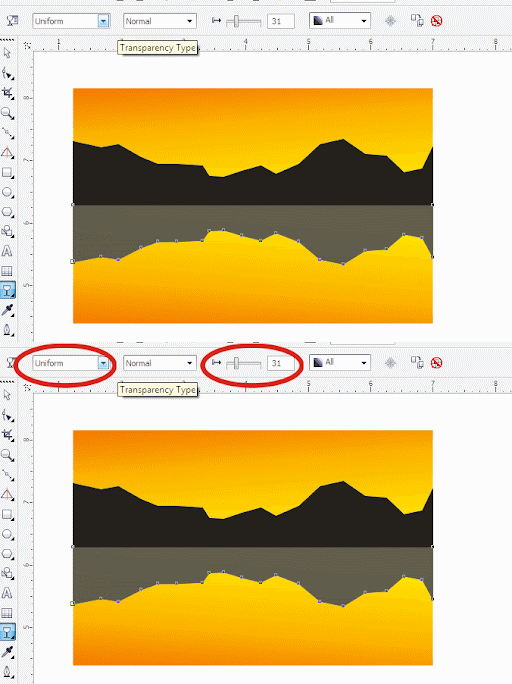
Step 5: Select that mirror object, chose a TRANSPARENCY TOOL from the left TOOL BAR.


Step 6: Look at carefully on below picture. Select TRANSPARENCY TYPE at UNIFORM. Adjust STARTING TRANSPARENCY.


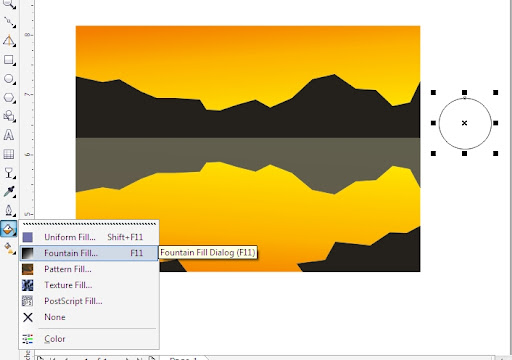
Step 7: Now our mountain and lake is ready. We need to make a Sun so with the help of a CIRCLE TOOL make one circle like shown in below.


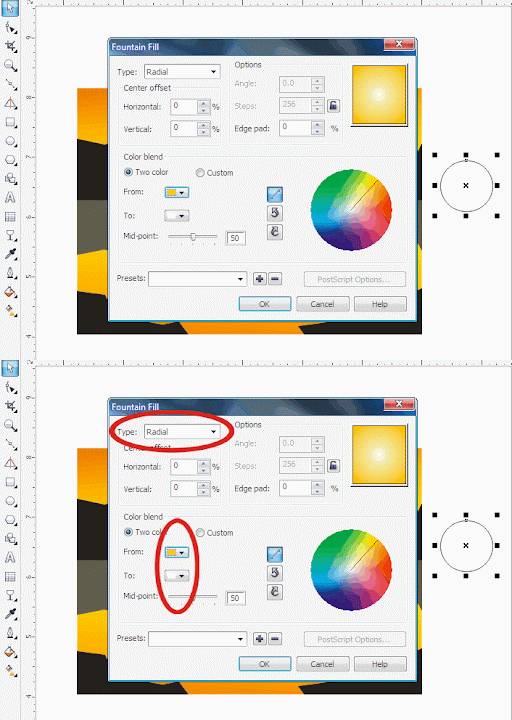
Step 8: Select a circle and chose a FOUNTAIN FILL TOOL. In the coming up next little window.


Step 9: Select Type as REDIAL, chose tow color Orange and White and click on OK. Our Sun is ready.


Step 10: To put the Sun behind mountain follow this step – TOP MENUBAR –> ARRANGE –> ORDER –> Click on BEHIND. Now click on Mountain. Sun is behind mountain now as shown below picture.


Step 11: For making a coconut tree use again BEZIER TOOL and draw it roughly like this…. Select whole Coconut Tree and click on 90% Black color for it as I already mention in STEP 3.


Step 12: Make 2 or 3 more different sized Coconut Tree and put them like shown in below picture. Our Drawing is almost ready.


SpeakAsia COO arrested for 1,320cr scam

0 comments


MUMBAI/INDORE: In an operation that unfolded in Indore, the economics offences wing of the Mumbai police arrested the chief operating officer of SpeakAsia-a Singaporebased pyramid-marketing company-in the wee hours of Friday for allegedly perpetrating a nation-wide scam amounting to Rs 1,320 crore.

Three other senior members of the company were also arrested but not the CEO, who the police say, is hiding in Dubai .

The firm, which claims to have 12 lakh clients in India, has also been accused of transferring more than Rs 700 crore to Singapore.

Full News at

timesofindia.indiatimes.com/business/international-business/SpeakAsia-COO-arrested-for-1320cr-scam/articleshow/9416380.cms

Shutdown Computer with a Cell Phone via Outlook Express

0 comments


Using this method, a user can shutdown, restart, hibernate, etc. his or her computer, just by sending an email from his or her phone.

To do this, all you will need is Microsoft Outlook which should come with Microsoft Office, which most people have. This will need to be on the computer wish you wish to shutdown.

So, this is how you do this:

1. First, you need the batch files to perform the Shutdown, Hibernate etc. You can write them down yourselves

2. open your note pad

and write lik this...

c:\windows\system32\shutdown -s -f -t 00

and save it as shutdown.bat

3. Open up Microsoft Outlook. Make sure that you have already configured it for your email.Now we will need to make it so that Outlook checks your inbox about every minute (1 minute for testing time can be increased if a delayed shutdown is desired). You can do this by going to Tools: Options.

4. Then click the Mail Setup tab, and afterwards, the Send/Receive button.


5. Make sure that the Schedule an automatic send/receive every... box is checked, and set the number of minutes to 1. Now you may close all of these dialog boxes.

6. Now go to Tools: Rules and Alerts... Next click the options button in the upper right hand corner and press the Import Rules button.

7. Now select the shutdown.bat file ...whi u hv created ...

8. Now, when you send a message from your phone to your e-mail address with the subject shutdown or smsshutdown%%, your computer will shutdown.

Abstract Text Effect By Photoshop

0 comments

Start a new document having resolution 1024X768

Apply a normal linear gradient over it just look like in figure
Having color selection 007dbe, 028ccd, 07a0e3, 32b4f0, 68cdf7 respectively


Now just open this texture


and paste it over the background layer and change its light mode as shown in figure to hard light


Now go to the layer ->new adjustmet layer->levels

And apply level as shown below


Now open a new transparent layer by going layer->new -> layer

And apply some of the star brushes as i gave you earlier in another thread named as JIM style brushes and apply them as shown in figure

and i m not able to find that thread so here is the link


http://hotfile.com/dl/23013178/db7bfff/star_brush_by_jim.abr.html


Now apply one more brush i applied water brush (google it ) over another new transparent layer
You picture should look like this now


Now if u want to balance some color you can do it by going to the layer->adjustment layer->color balance


I balanced it as shown in figure you can do your own color balance

Now background is complete ,we will move to the text area


Put some text as i put my brother name(a retarded orphan child) there you can use any name


And you can give any color

Now just apply in blending mode as i did 


Now click on T of text layer as shown in figure


It will select the whole text area now press ctrl+C and ctrl +V and hide the text layer it will look like as shown in figure

And change the light mode to soft light i brushed it selected area with black color


Now again set blending option as i did


Now it should look like


Installing Windows XP in 10 Minutes.

0 comments


Here i am going to the secret that i got to know last night while making format. I found that we can bypass the 39 minute of time while we are installing windows xp.

Hope U Will Like IT...


We all know that after loading the file or copying the file from the boot disk to temporary space the system requires a first time reboot.


Now if we press shift+f10 then the task manager will open and there we will find that a process is running named setup.exe

Now our task is to make the priority of this process maxm by right clicking on that.


We are done.

Find ur xp installed in 10 min with tolerance 2 min

5 Pirate Bay BitTorrent Alternatives

0 comments

The Pirate Bay we know and love, though still harboring torrents for now, is going away. But that doesn't mean BitTorrent is dead. Far from it. Here are five places to get your torrent on after it closes for good.

1. Demonoid.com


Demonoid, besides having a solid community and good quality torrents—no porn, exceedingly few viruses—also operates the other major torrent tracker besides The Pirate Bay. (A tracker is what help makes the whole BitTorrent system work, since it makes sure every peer's talking to each other properly.) It doesn't have the best selection around, but what most of what you'll find there is quality. The catch is that you need to snag an invitation from a member or when they periodically dole them out to the public.

2. Mininova.org


Mininova's always one of our preferred torrent sites—tons of torrents from multiple trackers, not a lot of crap in the interface, and the search isn't bad. Actually, it's kind of the like The Pirate Bay, but with less crap and fewer headaches. The catch now is that they're slowly implementing a new copyright filter to keep copyrighted torrents from being uploaded. But you should still be able to find True Blood on there, no problem.

3. ISOHunt.com


ISOHunt is a BitTorrent and P2P search engine that's got what feels like the most sophisticated search engine of the bunch. But like the others, you just punch in what you're looking for, and it pulls up results you can sort by seeds, date or whatever. It has one of the most massive indices of any site, so it's a good thing the search engine is up to it. Still, with a lot of torrents, it can be hard to find exactly what you're looking for.

4.BTJunkie.org


BTJunkie claims to be the largest torrent search engine of all, with around 5,000-25,000 new torrents added to the index daily. The quantity doesn't seem noticeably better than the other sites listed above, however. Also, the interface is really ugly. But you know, it's there if you need it.

5.EZTV.it


If you've downloaded a TV show, whatever site you snagged it from, chances are, it came from these guys. They're the most prolific TV rippers around, and usually have solid quality rips of shows up within hours of airing. If you're interested in TV, you might as well just go to the source—their site points to wherever their files are hosted, so you don't have to search through a million different sites to find the right EZTV torrent.

The whole scene is admittedly a bit depressing now, after years of high profile closures—Suprnova, OiNK TorrentSpy and LokiTorrent—so these are what's left of the big sites. And even they're not guaranteed to survive. Demonoid went offline for several months back in 2007-2008, Mininova has a copyright filter attached to it, and really, any site is just a police raid away from possibly going down. So tread carefully, and don't get too attached to any of them.

Check if a website is really down!!

0 comments


One of the most frustrating things about searching the web is coming across websites that are not working, under construction, or can’t load.

Could it just be your computer connection??? Is there a permanent problem with the website????

The website DownForEveryoneOrJustMe.com allows you to know just that. You simply enter in the desired url address, and the program will let you know if it is a problem with your computer, or a general problem with the website. The response is rapid and straightforward; DownForEveryoneOrJustMe.com replies straightforwardly: “just you,” or “Yikes! The website is actually down!”

Microsoft comes up with a new social site?

0 comments

It seems to me like Microsoft is planning for a launch of new social networking site in partnership with Facebook and Twitter. Here is the first glimpse of the socl.com homepage that got revealed by mistake. The site was originally owned and operated by Microsoft.


But once it was out in news, Microsoft immediately hid the page saying "Socl.com is just an internal design project from a team in Microsoft Research which was mistakenly published to the web and they did not mean to create it honestly."

So what your take on this? Do you really think socl.com is just an internal design project or is Microsoft really planning to start a new social networking site? Let us know in your comments

Create Moving image Optical illusion......By Photoshop

0 comments

How to Create a Moving Image Optical Illusion


Ever notice how sometimes images can play tricks on you? In today’s tutorial I will demonstrate how to create an optical illusion that appears to move, even though in reality, it is standing still. Let’s get started!


Tutorial Details
Program: Adobe Photoshop CS3
Difficulty: Beginner
Estimated Completion Time: 1 Hour


Step 1


Create a new document with dimensions set to 1280px by 800px.

Step 2


Hit CMD + R to enable rulers if you don’t have them turned on by default. Make sure they are displaying pixels. Create a new guideline every 50 pixels both vertically and horizontally. You can create them by going to View > New Guide or by clicking on a ruler and by dragging it onto the canvas. If you prefer to use a dialog box then you’ll have to turn it on several times and simply type in values starting from 50px to 1250px in case of vertical guidelines and 50px to 750px in case of horizontal guidelines.


Step 3


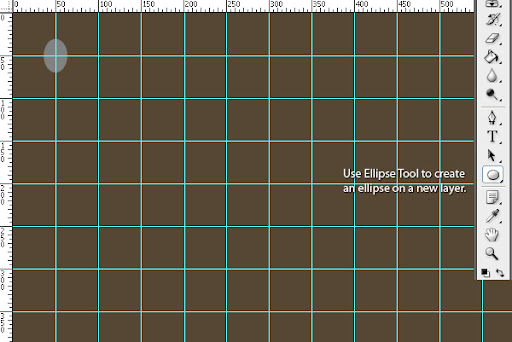
Fill the background layer with #564734 using the Paint Bucket Tool (G). Grab an Ellipse Tool (U) and create an ellipse on a new layer (hit CMD + Shift + N and Enter to create a new layer). My ellipse has 46px by 34px including a 3px black and white border. So, I’d recommend something that has between 43px by 31px at first but it doesn’t have to have exactly these dimensions. Its dimensions don’t make a huge difference but your ellipses have to be placed close together. Large gaps will produce poor results.

Step 4


Double-click on the thumbnail of your layer with ellipse and apply the following style. Turn on Stroke. Change Fill Type from Color to Gradient. Change Angle from 90 degrees to 180 degrees. Click on the gradient bar and a new window should pop up. Create two additional indicators in the middle of the bar. Set first two indicators to white (#ffffff) and the last ones to black (#000000). Also enable Color Overlay and change its color to #564734 for instance.

note: the above image size is not so big so please Download it to view it clearly

Step 5


Now grab the Ellipse Tool (U) again and create a new layer above your previous layer (hit CMD + Shift + N and Enter). Draw a smaller ellipse inside your last one. Its size is up to you. Just make sure everything looks like on the image below.

Step 6


Group these two layers by selecting them and hitting CMD + G. Right-click on the group and choose Merge Group.

Step 7

Move your first layer there where the two guidelines cross in the top left corner as shown below.

Step 8


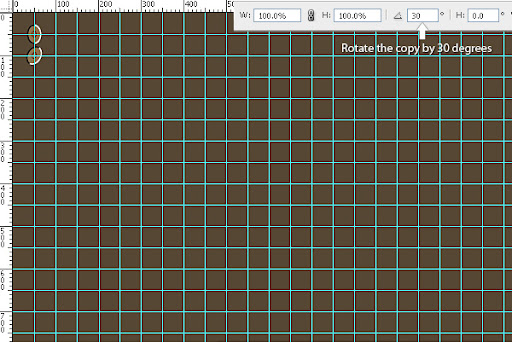
Hit CMD + J or go to Layer > Duplicate Layer in order to duplicate this layer. Place the copy right below your first layer. Once it’s exactly in the middle of the two crossing guidelines hit CMD + T. Rotate the copy by 30 degrees. You can do that in the top toolbar (see the screenshot below).


Step 9


Keep copying THE FIRST ellipse and rotate each copy by multiples of 30 degrees. Place each copy on top of everything else (that’s also very important). Once you get to 180 degrees you won’t be able to type in 210 degrees so just use negative values. So, third copy would have 60 degrees, fourth 90 degrees, seventh 180 degrees, eighth -150 degrees and so on. Once you are done you should have 15 copies in total. Select each copy by selecting the first one in layers’ palette, holding Shift key and selecting the last one. All the copies in between should have become selected. Hit CMD + G to group them.


Step 10


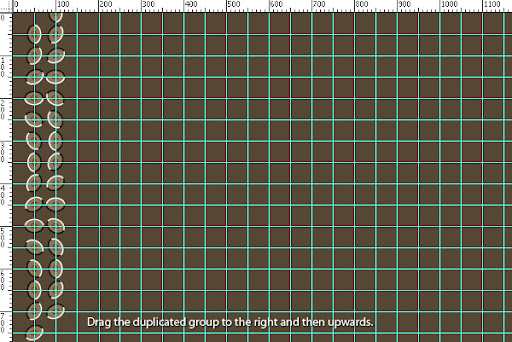
Go to Layer > Duplicate Group and duplicate it. Select your Move Tool (V) and drag this group like one the image below.

Step 11


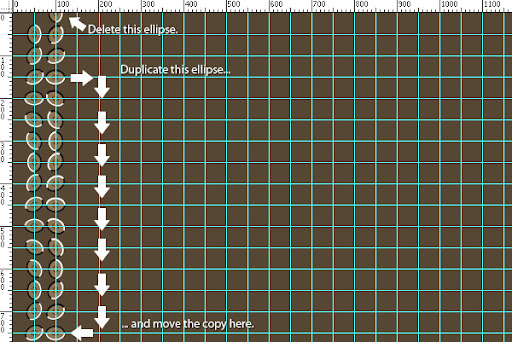
Open up your newly created copy of the group and remove the very bottom layer (which should be your very top ellipse). Then duplicate the third layer counting from bottom of this group which should be your third layer counting from top of the ellipses. If you’re unsure which layers should be removed and which moved then take a look at the image below.

Step 12


Repeat the 11th step several times until you get the final image.


When Does This Effect Work?


This effect will work in several instances.

1.You can use many different shapes to achieve the same effect. Circles and ellipses seem to work the best but rectangles or squares would do the trick as well
.
2.Each shape should be lighter on one side and darker on the other. This could be a black and white border like in my case or just a gradient with any color as long as there is a visible contrast between them.

3.You can put something inside the shape to make it more detailed.
Your image should consist of many similar shapes and each one has to be really close to one another.

4.Your image should be large enough so that it makes your eyes constantly move.

5.You can create just about any pattern from these circles or ellipses.

6.You should rotate your shapes step by step so that their darker sides (black in my case) are right next to the lighter ones (white in my case). It is very good idea to rotate each circle a bit (like 15 degrees or 30 degrees). If you don’t rotate them it should still work fine but it would ‘move’ vertically or horizontally.

7.Other than that you won’t get this kind of effect or it wouldn’t be as much observable.


How Does This Effect Work?

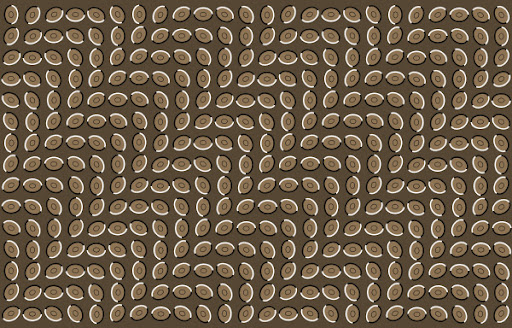
When we look at the image below, our brain tries to convert it from 2D to 3D. This is because the borders around the ellipses are inconsistent. This confuses us and creates an illusion of movement.

Final Image

Take a look at the final image below.